Sunday

Daftar Google Sitemap

Google, google, dan google lagi yang dibicarakan, ada apa dengan google? Memang tak dapat dipungkiri bahwa sebagaimana kita ketahui si mbah google ini merupakan situs yang mempunyai search engine atau mesin pencari terkenal di dunia untuk saat ini, ribuan atau bahkan jutaan website/blog bersaing memperebutkan perhatian mbah google agar situs miliknya di tempatkan pada urutan teratas pencarian. Dan tentunya apabila website/blog kita di tempatkan pada urutan teratas, niscaya website/blog kita berkesempatan di banjiri oleh pengunjung dari bebagai penjuru dunia, bukankah itu yang selama ini kita harapkan?

Dengan mendaftar ke Google sitemap maka setiap artikel yang kita posting akan secara otomatis di tangkap oleh google. Ada satu hal yang perlu di ketahui yaitu anda harus mempunyai account email di google, akan tetapi anda tidak perlu kawatir karena tak seperti waktu dulu yaitu untuk membuat email di google harus di invite oleh orang lain, sekarang sudah bisa sendiri. Bagi yang belum punya bikin dulu deh, jalan yang mudah adalah coba login di google dengan email yang di berikan untuk Blogger.com, nah nanti akan secara otomatis di suruh upgrade ama ntuh mbah google dan di suruh melengkapi formulir bikin account di google.

Agar intermezonya tidak terlalu panjang, bagi yang mau daftar Google sitemap silahkan ikuti langkah-langkah berikut ini :
  1. Login di google dengan ID GMAIL anda, silahkan kunjungi Google sitemap.
  2. Setelah berada di halaman account anda, alihkan perhatian ke halaman sebelah atas ! di sana terdapat kotak isian di samping tombol Add Site, isilah kotak tersebut dengan alamat blog anda. Contoh : http://singjatibarang.blogspot.com
  3. Klik tombol Add Site
  4. Klik link Verify your site
  5. Klik menu dropdown yang ada, pilih metode yang di inginkan. Biar mudah pilih saja yang Add a meta tag
  6. Copy meta tag yang di berikan, lalu paste pada notepad atau text editor yang lainnya agar mudah di gunakan nantinya.
  7. Silahkan masuk ke account blogger dan tuju blog yang di daftarkan tadi
  8. Copy paste meta tag yang di berikan tadi, sebaiknya di bawah kode data:blog.pageTitle untuk template baru atau di bawah kode untuk template klasik, jangan lupa klik tombol Simpan Template.
  9. Bila sudah selesai, tuju kembali Goggle site map, lalu klik tombol Verify
  10. Jika semua berjalan dengan baik, akan ada tulisan “You've successfully verified http://NamaBlogAnda.blogspot.com/”
  11. Selesai.
Bila anda mempunyai beberapa blog, anda tinggal memasukan lagi ke Add Site, ikuti seperti langkah sebelumnya.

Semoga blog anda tampak lebih menarik di mata mbah google.
Read rest of entry

Cara Daftar Search Engine

Tak di sangkal bahwa tujuan utama dari membuat blog antara lain adalah agar tulisan-tulisan kita bisa di baca oleh orang lain atau pengunjung blog, semakin banyak yang berkunjung apalagi memberikan komentar pada apa yang kita posting tentunya akan membuat hati kita merasa senang dan bahagia. Akan tetapi tentunya tidak serta merta blog kita akan ramai di kunjungi, ini memerlukan usaha publikasi yang gencar dari pemilik blog apabila ingin banyak pengunjungnya.

Banyak cara yang bisa kita lakukan agar blog kita bisa dikenal dan di kunjungi, antara lain adalah dengan rajinnya kita blogwalking atau berkunjung ke blog milik orang lain, mendaftarkan ke berbagai agregator, dan yang paling efektif adalah melalui search engine atau mesin pencari.

Bagi blogger pemula mungkin berangggapan bahwa apabila kita membuat website atau blog akan secara otomatis terindeks atau berada pada list berbagai search engine, dan kenyataannya tidaklah demikian. Seperti halnya sebuah sekolah, agar nama kita terdaftar pada buku daftar siswa, tentunya kita harus melakukan pendaftaran terlebih dahulu ke sekolah tersebut. Sama halnya dengan mesin pencari, agar blog kita terindeks pada mesin pencari, maka kita harus terlebih dahulu mendaftarkan blog milik kita pada situs pemilik mesin pencari.

Mesin pencari tentu jumlahnya sangat banyak sekali, dan pada saat ini yang paling terkenal di dunia adalah Google, Yahoo, serta Msn. Apabila blog kita ingin terindeks pada mesin pencari mereka, maka kewajiban kita adalah mendaftarkan URL blog kita pada mesin pencari mereka. Bila ada yang belum tahu ke manakah harus mendaftarkan blognya, maka silahkan simak tulisan berikut :

  • Daftar Google
Untuk mendaftar ke google, silahkan Anda kunjungi http://www.google.com/addurl/, nah apabila sudah berada pada halaman pendaftaran ada beberapa langkah yang harus di lakukan, yaitu mengisi form yang di sediakan :


  • URL --> Isi dengan URL blog Anda.


  • Comments --> Isi dengan keyword atau kata kunci yang berhubungan dengan blog Anda


  • Isi kotak kosong dengan huruf Verifikasi yang tersedia


  • Klik tombol Add URL


  • Selesai.


Setelah Andat melakukan pendaftaran ke Google, maka tidak serta merta blog Anda terindeks pada mesin pencari nya, akan tetapi memerlukan 3 sampai 4 minggu baru blog Anda bisa terindeks. Jika sudah 3 sampai 4 minggu, maka cobalah ketik alamat blog Anda pada mesin pencari google, apakah sudah terindeks atau belum? jika belum, coba tunggu beberapa minggu lagi, dan tuliskan kembali alamat blog Anda, Jika ternyata masih belum juga, coba deh daftarin lagi blog nya ke google seperti langkah di atas. Atau mungkin Anda tidak sabar ingin cepat terindeks, sebenarnya bisa saja ini terjadi, hanya dalam 3 atau 4 hari saja blog Anda sudah bisa terindeks di google. Ingin tahu caranya? simak saja postingan berikutnya ya, mungkin satu dua hari ke depan artikelnya selesai saya buat.
Read rest of entry

Thursday

No Lag Using YF-Client

The goal is how to make ANY application, including GAMES to go full speed under YF.
We going to need:
  • Proxifier, now compatible with Mac OS X, if you know how to make it running for linux,please let me know
Proxifier is a program that allows network applications that do not support working through proxy servers to operate through an HTTPS or SOCKS proxy or a chain of proxy servers.
http://www.proxifier.com

  • Of course Your Freedom client(YF)Set up
Install everything, then fact is MORE secutity LESS speed, so open YF and we going to set security at minimum level

Go to YF Configure and then from up to down

-Address: the YF server you want to use
-Port: 80
-Protocol: http

UNTICK all OPTIONS except

-Reconnect after server shutdown
-Redirect SOCKS4/5 DNS to Freedom server

And click SAVE and Exit

You YF is ready to go click Start Connection

Run Proxifier click in Options, Proxy Settings... Add with the following

-Adress "localhost" Port "1080"
-Protocol tick "SOCKS version 4"
-Settings tick "Use SOCKS 4A extension. (remote hostaname resolving feature)

And OK
Click in Options,Proxification Rules...leave ticked "Process All Except the following + manually proxified"

-Default, click OK to the warning message

OK

Now we going to CHECK Proxifier running on TOP of YF Click in Options, Proxy Settings. we leave in BLUE our proxy settings and CHECK All GREEN means OK and ready Now you run you application, you should feel better speed less lag, I love to receive feedback on this and tell me if you application / game gets any better/worse

Thanks for reading and enjoy!!
Read rest of entry

Tuesday

Trick in Around Internet

If You have folder the supersecretness, better the folder hidden. There is one way so that the folder hidden. Though activate file hidden show, remain to will not seen.


Its way as follows:


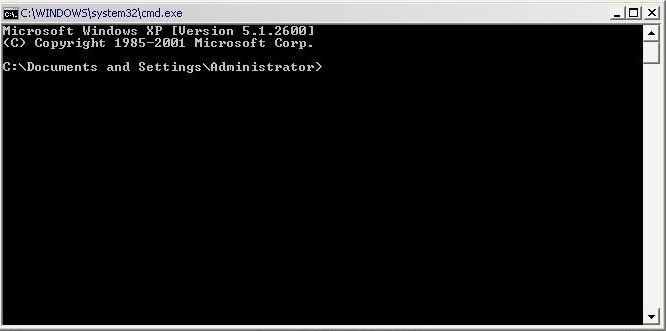
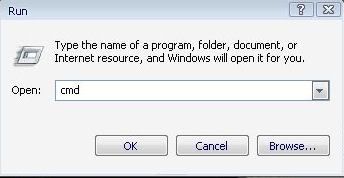
1. Depress Windows + Last R typed cmd

Photobucket

2. Enter. Will come up window of command prompt.

Photobucket

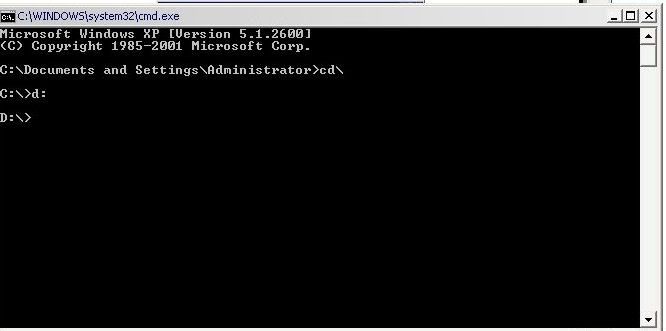
3. Step into folder to in hidden. This example of, I will hide photo folder residing in D:/ secret. Type D: last of and enter

Photobucket

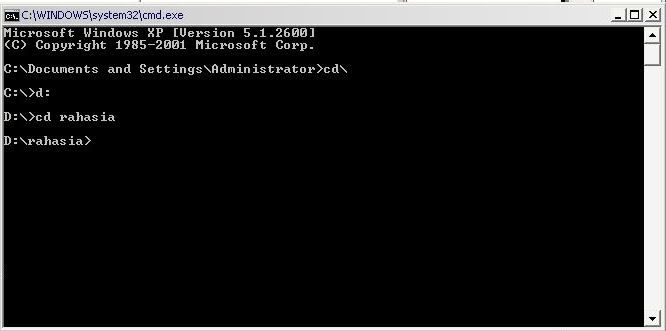
4. Type last secret cd of enter.

Photobucket

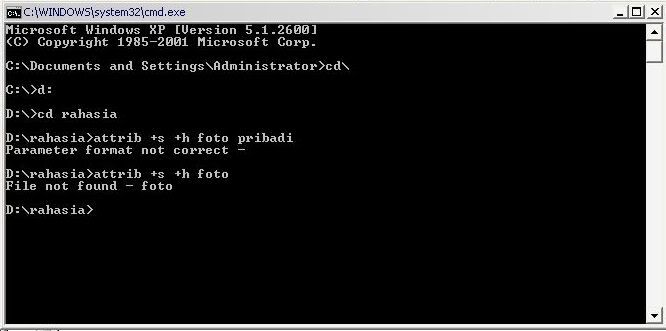
5. Type attrib + s + h foto

Photobucket

Nowadays, the folder lose.
Read rest of entry

Monday

Internet Download Manager New!

Internet Download Manager(IDM)

Internet Download Manager(IDM) is a tool to increase download speeds by up to 5 times, resume and schedule downloads. Comprehensive error recovery and resume capability will restart broken or interrupted downloads due to lost connections, network problems, computer shutdowns, or unexpected power outages. Simple graphic user interface makes IDM user friendly and easy to use.Internet Download Manager has a smart download logic accelerator that features intelligent dynamic file segmentation and safe multipart downloading technology to accelerate your downloads. Unlike other download managers and accelerators Internet Download Manager segments downloaded files dynamically during download process and reuses available connections without additional connect and login stages to achieve best acceleration performance.

Internet Download Manager supports proxy servers, ftp and http protocols, firewalls, redirects, cookies, authorization, MP3 audio and MPEG video content processing. IDM integrates seamlessly into Microsoft Internet Explorer, Netscape, MSN Explorer, AOL, Opera, Mozilla, Mozilla Firefox, Mozilla Firebird, Avant Browser, MyIE2, and all other popular browsers to automatically handle your downloads. You can also drag and drop files, or use Internet Download Manager from command line. Internet Download Manager can dial your modem at the set time, download the files you want, then hang up or even shut down your computer when it's done.

Other features include multilingual support, zip preview, download categories, scheduler pro, sounds on different events, HTTPS support, queue processor, html help and tutorial, enhanced virus protection on download completion, progressive downloading with quotas (useful for connections that use some kind of fair access policy or FAP like Direcway, Direct PC, Hughes, etc.), built-in download accelerator, and many others.

Version 5.17 adds IDM download panel for web-players that can be used to download flash videos from sites like YouTube, MySpaceTV, and Google Videos. It also features complete Vista support, YouTube grabber, redeveloped scheduler, and MMS protocol support. The new version also adds improved integration for IE and IE based browsers, redesigned and enhanced download engine, the unique advanced integration into all latest browsers, improved toolbar, and a wealth of other improvements and new features.
Read rest of entry

Internet Speed Test

Internet Speed Test

Internet Speed Test for Broadband, Cable, Satellite and DSL Modems that helps determine your true bandwidth.
Internet Speed Test Note Did you know we have two more very cool speed tests that you can take?
Read rest of entry

Friday

Opera Mini Mod 3.11

This is new release of OM mod 3.11 English java version.


Opera 3.11 new feature added:

1. copy, paste and templates to create a folder / file, as well as the use of the selected folders or selected files as a template a name for the file or folder, respectively.

2. Hold boot. Setting the date and time when you need to start the download. It works both in a single download, and when downloading the list. Hold loading added to the list in the form of injection to pause. The timer checks the time every minute. After restarting the program automatically starts a countdown timer, that is enter the loader and activate it is not necessary.
ATTENTION! BEFORE updated version needs to be completed ALL PREVIOUS injection, as PRESERVATION OF SETTING UP LISTS, LISTS OF EXPORT, injection in the window STATUS FROM PREVIOUS VERSION not to rebuild!

3. Pause all users working with incoming calls or the telephone system winding down applications or other operations, giving application to a pause, is included in the presence of a jackdaw.

4. When choosing a hot button on the function, there is verification of employment nabrannoy combinations and the withdrawal of the title role, as set by this combination.

5. Go to the window of loader menu-go-window status.

6. Support for HTTP-proxy. ONLY CMWAP, ie not a standard HTTP-proxy.

Attachment

operaminimod.v3.11en.jar (280.82 KB)
Read rest of entry
 

Blog List

Followers

INDRAMAYU Copyright © 2009